

Installing Linux Mint is a fairly straight forward process. Any perceived level of difficulty installing Linux Mint usually comes down to the end user deciding to make things more complicated.
In this article, I’ll share my advice for making your Linux Mint installation really simple, plus I’ll walk you through the process from the very beginning to the very end.
Linux Mint Installation – The dedicated drive option
If you’re brand new to the Linux Mint world, you might be tempted to completely delete your Windows installation and then drop in Linux Mint instead. On the surface, this might seem like a great idea. But I honestly don’t recommend it without addressing the following:
1. Migrated Data – Have you already successfully migrated your data over to Mint, feel comfortable with the applications provided and have found you won’t need access to Windows software?
If this is true, fantastic and welcome! Unfortunately, many of you may still wish to run legacy apps like Photoshop, Microsoft Office, and so forth. The good news is you can in many instances, get these running in WINE. However the application versions proven functional in WINE is all over the map. Generally a good rule of thumb is older is more likely WINE compatible. Same thing applies to Windows games.
2. Tested Hardware Compatibility – Have you tested out Linux Mint hardware compatibility using a Linux Mint live installation on a thumbdrive or DVD? This is an example how you can run Mint on your computer without ever touching your Windows partition. Everything is running in RAM and you revert back to Windows by simply powering down your PC and removing the Linux Mint media.
If you have done this and found that all the hardware (including printer and wifi) appear to operate within expected parameters, then you may be a great candidate for Linux Mint. If instead, you find that some stuff works and other stuff doesn’t, I recommend sticking with the live installation until you have handle on whatever isn’t working as expected. This is often times merely installing a proprietary video driver, wireless driver or tweaking a conf file. For extended work in this area, I recommend looking into a Linux Mint installation with persistent storage.
The point: if you feel comfortable after testing out your software and hardware, I fully support blowing away your Windows installation. But do your homework first and make sure it’s a decision you’re comfortable with. Worst case, you change your mind and can restore from a Windows hard drive image backup.
Should you choose to go this route, dedicating the entire hard drive to Linux. You will want to use the erase everything, install Linux Mint feature from the distro’s installation tool. Step by step instructions on how to do this can be found later in the article.
Linux Mint Install – Virtual Machine option
If you’re brand new to Linux and just want to see what it’s like, I highly recommend using a Virtual Machine option with something like Virtual Box. This virtual machine tool is free, easy to use and won’t affect your Windows installation whatsoever. The only real consideration here is running the virtual machine on a PC with enough CPU power and RAM to handle running a second OS in real time on a single machine.
To do this with Virtual Box, simply follow these instructions set out for Ubuntu users. The Virtual Box steps are the same for Linux Mint, and the actual Mint installation elements are addressed in the how-to guide further along in the article below.
Using this approach allows you to try Linux Mint immediately, plus you won’t have to bother with a flash drive or DVD media. The disadvantage to this of course is that this only allows you to try the software. You won’t be able to test your PC’s hardware compatibility as this is in a virtual environment. So if you’re testing hardware, best use live media for Linux Mint instead.
Linux Mint Install – Dual-booting Mint and Windows
Before we go any further allow me to state the following: Running a dual-boot Windows/Linux PC is tricky business thanks to modern UEFI headaches. The good news is most modern Linux distros like Linux Mint absolutely support UEFI based computers. The issue is that there are specific steps you must take to get the dual-boot working as expected. Using this guide is probably your best bet as it correctly has the end user starting with Windows, then moving onto installing their Linux distro.
All of that said, I also know for a fact that there are instances where Windows updates mess up your ability to access Linux upon rebooting. Instead, sometimes you’re only presented with Windows. This means manually fixing the boot record when Windows pulls this kind of nonsense. Some might claim this isn’t something they’ve experienced, however I have seen it first hand multiple times. It’s very real and something you must take into consideration if you decide to dual-boot.
If you have the resources, I recommend simply keeping Windows on a Windows box and Linux Mint on a Linux box. But obviously this isn’t an option for everyone.
Linux Mint Install – The Step By Step Installation Guide
Now that we’ve talked about how you can install Linux Mint, let’s look at the basic steps needed for a proper long term installation. This install guide is going to assume you’ve set aside a hard drive for a dedicated install. Links are above for those who wish to dual-boot or run with a virtual box installation.
Step one – Boot from the installer
Once you’ve booted from the installer and arrive at the Linux Mint desktop, you then need to click on the disc image on the desktop called Install Linux Mint.

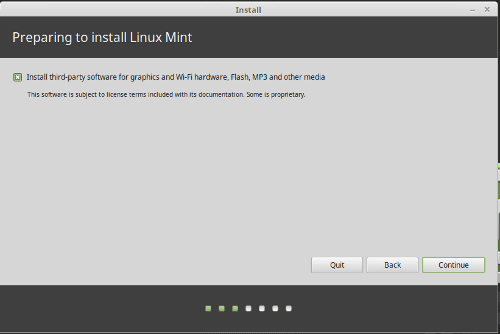
Once the installer starts, you’ll be asked to select a language. After that, the next step is to decide whether or not you wish to include proprietary software for wifi, Flash and other media.
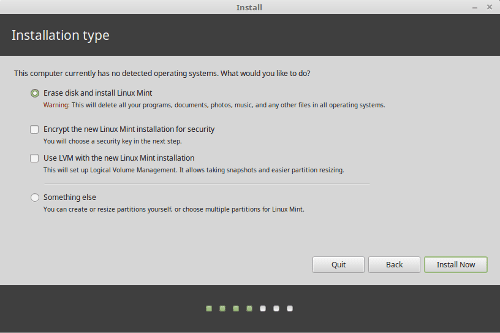
It’s at this point that you need to make an important decision. If you’re going to do a dedicated Linux Mint installation, then all you need to do is choose Erase disk and install Linux Mint. Additional options such as encryption, LVM or custom partitioning are also provided.
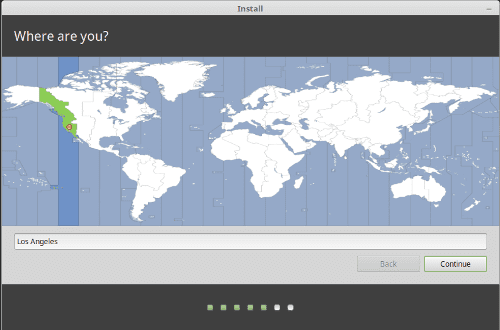
Now you need to choose your region/country/time zone.
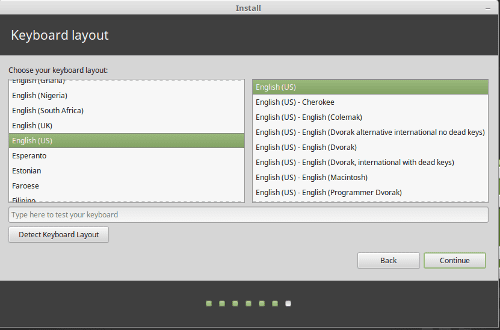
Thus far, the installation has been fairly straight forward. But an important step is about to take place and that’s where you select your keyboard layout. By default, mine was preselected correctly so I was able to simply click Continue.
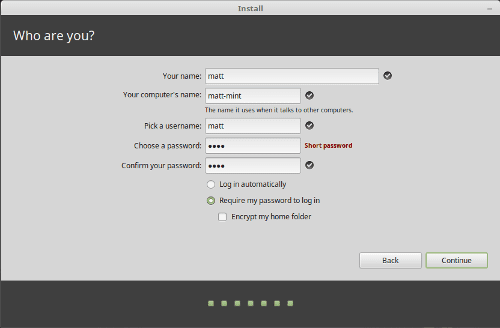
This next step is critical. First of all, you need to make sure you select a username that works for your needs. But more importantly, you need to select a password that’s secure as it will provide you with super user capabilities. In my example image, I chose a non-secure password to show you how Linux Mint will warn you if the password is too short. It’s allowed, but you will get a warning if choosing a short password.
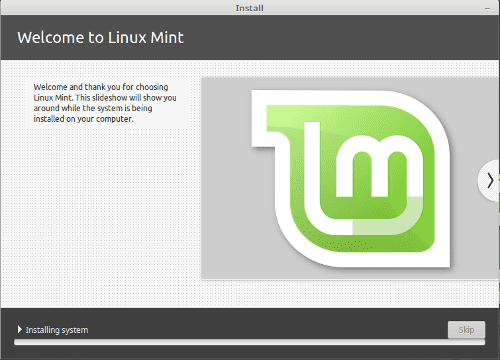
Finally, we have the Linux Mint installation finishing the last of its install. From here, you might as well grab a cup of coffee or tea. Depending on the speed of your computer, this final process may take a few minutes.
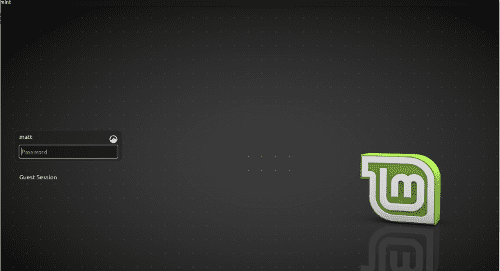
Once the installation is completed, you need to remove the flash drive or DVD so you can reboot your computer into Linux Mint.

Once the PC is done rebooting, you should be looking at a fresh login screen for Linux Mint.
Linux Mint Install – Overcoming boot errors and other issues
Despite your best efforts, no operating system is ever completely free from bugs. Sometimes these bugs lead to black screens. In other instances, you may boot to the Linux Mint screen yet the resolution is off or distorted. This usually happens if the driver provided on the installation media fails to do its job for some reason.
For a black screen, it’s usually worth rebooting into the grub menu (hold down shift key), then selecting the Advanced options for Linux Mint.
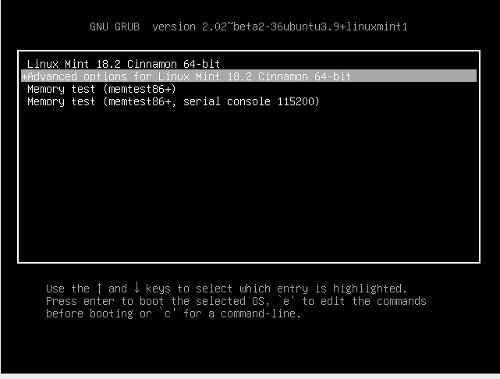
After that, select the second option as shown below. The idea here is that we don’t want a recovery mode, we want to get to a command line terminal to run some updates.

The next step is to login like you would from the GUI screen.

Ignore the systemd error as we are using an option designed to bypass it (upstart only). The next step I recommend is to update your system using the following command.
sudo apt update && sudo apt upgrade -y
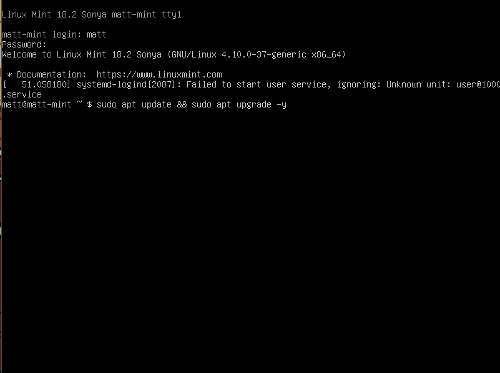
The above command will upgrade your system for you. Now reboot to see if you’ve gotten past booting to a black screen. In most cases, this will resolve the issues for you.
And that’s it. As you can see, installing Linux Mint isn’t difficult at all. All you need to do is follow the steps above and you’ll be running Linux Mint in no time. Are you a Linux Mint user? If so, what installation tips do you rely on? Hit the comments, I’d be interested in hearing your thoughts.
RELATED NEWS AND ANALYSIS
-
Huawei’s AI Update: Things Are Moving Faster Than We Think
FEATURE | By Rob Enderle,
December 04, 2020 -
Keeping Machine Learning Algorithms Honest in the ‘Ethics-First’ Era
ARTIFICIAL INTELLIGENCE | By Guest Author,
November 18, 2020 -
Key Trends in Chatbots and RPA
FEATURE | By Guest Author,
November 10, 2020 -
FEATURE | By Samuel Greengard,
November 05, 2020 -
ARTIFICIAL INTELLIGENCE | By Guest Author,
November 02, 2020 -
How Intel’s Work With Autonomous Cars Could Redefine General Purpose AI
ARTIFICIAL INTELLIGENCE | By Rob Enderle,
October 29, 2020 -
Dell Technologies World: Weaving Together Human And Machine Interaction For AI And Robotics
ARTIFICIAL INTELLIGENCE | By Rob Enderle,
October 23, 2020 -
The Super Moderator, or How IBM Project Debater Could Save Social Media
FEATURE | By Rob Enderle,
October 16, 2020 -
FEATURE | By Cynthia Harvey,
October 07, 2020 -
ARTIFICIAL INTELLIGENCE | By Guest Author,
October 05, 2020 -
CIOs Discuss the Promise of AI and Data Science
FEATURE | By Guest Author,
September 25, 2020 -
Microsoft Is Building An AI Product That Could Predict The Future
FEATURE | By Rob Enderle,
September 25, 2020 -
Top 10 Machine Learning Companies 2020
FEATURE | By Cynthia Harvey,
September 22, 2020 -
NVIDIA and ARM: Massively Changing The AI Landscape
ARTIFICIAL INTELLIGENCE | By Rob Enderle,
September 18, 2020 -
Continuous Intelligence: Expert Discussion [Video and Podcast]
ARTIFICIAL INTELLIGENCE | By James Maguire,
September 14, 2020 -
Artificial Intelligence: Governance and Ethics [Video]
ARTIFICIAL INTELLIGENCE | By James Maguire,
September 13, 2020 -
IBM Watson At The US Open: Showcasing The Power Of A Mature Enterprise-Class AI
FEATURE | By Rob Enderle,
September 11, 2020 -
Artificial Intelligence: Perception vs. Reality
FEATURE | By James Maguire,
September 09, 2020 -
Anticipating The Coming Wave Of AI Enhanced PCs
FEATURE | By Rob Enderle,
September 05, 2020 -
The Critical Nature Of IBM’s NLP (Natural Language Processing) Effort
ARTIFICIAL INTELLIGENCE | By Rob Enderle,
August 14, 2020
ARTICLES