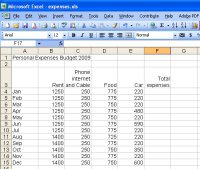
Microsoft Excel is a spreadsheet application that you can use to record data, make calculations and create charts. In this article I’ll introduce you to the basics of working in Excel. We’ll look at how to create, format and print a simple worksheet and how to chart the data in it.
Find Your Way Around
When you launch Excel you will see an empty worksheet divided by horizontal and vertical lines into a grid – the intersection of a column and a row is called a cell. If you click-and-drag the cursor over a number of cells to create a rectangular selection of cells, this is called a Range. Each cell has a name made up of its column letter and row number so the cell at the intersection of column B and row 4 is B4 (never 4B!).
When you work in a spreadsheet application you place data such as numbers or words into the cells to form a table-like arrangement. You can then make calculations based on the data in the cells, such as adding up a column of numbers, for example.
Your First Worksheet
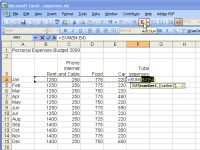 The AutoSum button on the toolbar lets you automatically total a row or column of numbers. (Click for larger image). |
To start your worksheet, click in cell A1 to select it, and type the worksheet title – I have titled mine Personal Expenses Budget 2009. When your title is wider than the cell the text overflows into the adjacent cells ‑ if there is nothing else in those cells.
Next, type your table headings, one per column across row three starting in cell B3. The headings I used are: Rent, Phone, Internet and Cable, Food, Car, Total Expenses. If your column headings are wider than the column, you should still put one heading per cell and don’t skip any columns. To display your headings you can widen a column by dragging on the marker between the adjacent column letters to the right. You can also wrap text in a cell by right clicking the cell and choose Format Cells > Alignment tab and select Wrap Text.
For the dates, type “Jan” into cell A4. Next click in the cell to select it, and locate the small handle in the bottom-right corner of the cell. Click-and-drag this downward to enter the remaining months of the year. To enter the data, click in a cell and type the number.
Creating Calculations
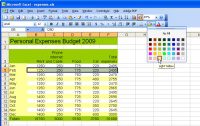 Change the color of a cell or range by using the Fill Color button on the toolbar. (Click for larger image). |
Excel has built-in tools to help you make calculations so, to total a row of numbers, click in the cell where you want the answer to appear – for example, cell F4 – and click the AutoSum button on the toolbar. Excel anticipates which figures you want to add and creates a formula for you in the cell. A border appears around the cells that Excel thinks you may want to sum. If the range is correct press Enter. If not, drag the border over the correct range of cells and then click Enter.
Having created one formula you can copy it down the column for the other cells. To do this, click the cell that contains the formula you want to copy, and drag the fill handle in its bottom right corner downward over the cells you want to copy the formulas into. You can repeat this and add totals for the columns, if desired.
Format the Worksheet
Once you enter the data, it is time to format the worksheet to make it easier to read and look more attractive. To add color, click in the cell and click the arrow to the right of the Fill Color button on the toolbar and choose a fill color. Continue to select a cell or range of cells and fill them with color.
You can also format your numbers to automatically add commas. Select the numbers you want to format and click the Comma Style button on the toolbar. To reduce the number of digits after the decimal point in the numbers, click the Reduce Decimals button on the toolbar twice. While the digits after the decimal point may disappear from the display, the underlying numbers remain unchanged.
To change the font or style of the text or numbers, select the cells and choose a different font or size from the toolbar options.
Charting Your Data
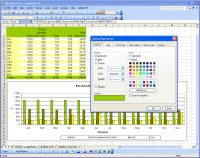
To create a chart of the information you just entered into the spreadsheet, select the data and the headings but not the totals. In this example you should select the cells that range from A3 to E15. Click the Chart Wizard button on the toolbar and select a chart type to create – a column chart is a good choice.
Click Next and check that the preview image looks best when you select Columns (if not, select Rows instead). In our case it makes better sense to plot Columns. Click Next. In the Titles area, type the chart title: Personal Expenses Budget 2009, the X-axis title: Expenses, and the Y-axis title:$. Click Next, and then click Finish.
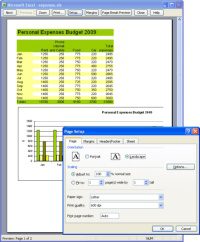 Before you print your worksheet, check the Print Preview to make sure everything is in order. (Click for larger image). |
Use the mouse to drag the chart into position on the worksheet. Next drag on the chart handles to enlarge it. Right-click any part of the chart to see the formatting options for that part of the chart. You can change the color of the elements and, in some cases, their position.
More Complex Formulas
You can save your completed worksheet to disk by choosing File > Save As and typing in a name for it. To print your worksheet, click in the worksheet and choose File > Print Preview. This lets you preview the worksheet on the screen to check and see that it looks right before printing.
If you need to change the paper orientation from Portrait to Landscape, for example, click the Setup button, choose the Page tab and click Landscape. Click OK to return to the Print Preview dialog to check your page again. If all is in order, click Print to print it.
Microsoft Excel is an extremely powerful program with lots of handy tools for organizing your data, making calculations and displaying the data in an easy to understand format.
This article was first published on SmallBusinessComputing.com.


